Let me start by saying that “there’s no single “right” way to stockpile water.”
There are so many water containers and purification methods on the market today, and most are great.
For example:
- For some, a single large emergency water tank is perfect for their emergency water storage needs.
- Others prefer to use many smaller stackable water jugs instead.
- Heck, some people don’t need any water storage containers at all since they have access to a pond or river/lake access.
With that said, there are several ways to do water storage WRONG.
To learn about AND AVOID many of these amateur mistakes – check out our Water Storage post over at Skilled Survival.
But today, I want to share my chosen emergency water storage solution.
My hope is that by sharing, I’ll help inspire anyone unsure where to start.
Jack’s Emergency Water Containers
Legacy Water Storage Containers
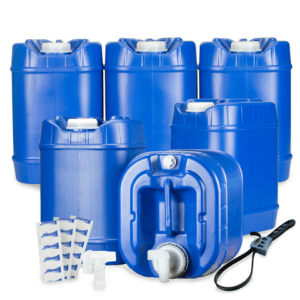
After much research, I ended up choosing The 5-gallon Blue Water Container from Legacy Premium.
Initially, I considered investing in a much larger single tank, but I was uncertain whether it would fit in my basement.
And I also didn’t love that I wouldn’t be able to “take it with me” should I move someday.
Plus, I prefer to avoid having to rotate the water in such a large container.
So instead, I went with this modular stackable plastic container system.
One that was a better solution for me to alleviate ALL of these concerns.
Why? Because each water jug will hold 5 gallons when full.
This equates to about 50 lbs each, the max most people want to haul around.
With the strong handle on top, I could pick it up and carry it down to my basement.
But if it had doubled the gallon capacity, I would have struggled.
On the other hand, if it were smaller (more like 2 gallons each), it would have felt like too much plastic was used than necessary.
Another highlight of these plastic containers is they are stackable.
And that’s exactly how I stored them.
My first round of these containers was stacked in two rows and three high.
But it’s nice to know I could go up to five high later when I decide to add to my emergency water stash.
And that’s another beautiful thing about these stackable jugs.
You don’t have to meet your ultimate water storage capacity goal to get started.
Instead, you can buy some today, a few more later, and keep adding to your stash until you meet your final goal.
And once you’ve invested in this system, it’s easy to “take your water with you” should you relocate.
And if you have a bug-out location – they stack well in the back of a pickup truck.
It’s ALL About Versatility
With a single large storage tank, you’re forced to give up quite a bit of versatility.
Versatility and flexibility are critical components of resiliency.
Sure, large water storage tanks are more efficient, but with extreme efficiency, you lose versatility and sacrifice resiliency.
Finally, what “sealed the deal” for me was if you buy the 6 jug package system, you receive some nice extras:
- A handy cap wrench (to ensure you completely lock and seal these containers)
- 2 spigots (this allows you to tap into two of the jugs at the same time). This is a nice option if you’d prefer to separate sanitation and consumption jugs.
- Water Purification Drop Treatment Solution (the perfect amount for 30 gallons).
So, once you receive Legacy’s 5-gallon Water Storage Package, you have everything you need to fill, cap, and treat your emergency water storage.
This makes the process very easy and simple.
Then, if I decide to purchase more, I can buy individual jugs since I don’t need any more spigots, wrenches, etc.
So next, I’ll share the process I used to fill and store my Legacy Premium Water Jugs…
Filling My Emergency Water Storage Jugs
First, I rinsed out each jug to ensure no plastic shavings or any organic materials were trapped inside during the shipping process.
It’s important to keep your sealed water jugs pure; it’s impossible to leave any materials or residues trapped inside.
Next, I filled up each jug with fresh water with my outdoor hose.
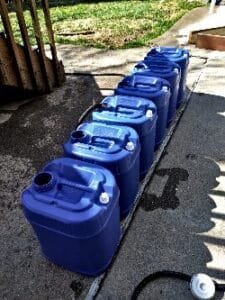
Jack Filling Water Jugs In Backyard
I took the Aquatabs droppers and mixed 1 teaspoon of part A with 1 teaspoon of part B.
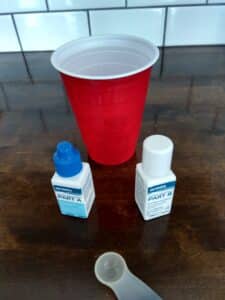
Purification Drops and Mixing Cup
Then, I let the mixture activate for 5 minutes.
Side note: I like how these two small bottles can purify exactly 30 gallons, which is the perfect amount if you choose the 6-jug—30-gallon total system.
Next, pour the water purification concoction into one of the 5-gallon containers.

Pouring The Treatment
Next, I used the provided band wrench to tighten the caps – nice and snug.
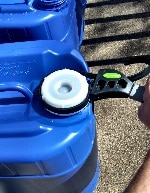
Tighten The Cap With a Band Wrench
Finally, I tipped and shook each jug for 30 seconds before carrying them to the final storage location.
That’s it.
I’m good with 30 more gallons of potable H20 for 5 years without having to worry about rotation!
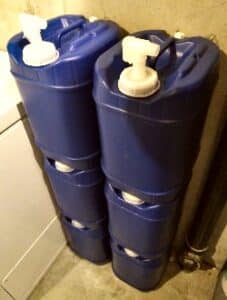
Stack Of Water Storage Containers
This is an easy way to provide flexible, affordable emergency water storage.
I’m happy with this water storage solution, and I recommend it to anyone who’s just getting started on their resiliency journey or would like to expand their water storage goal a bit more.
Until next time:
Prepare, Adapt & Overcome,
“Just In Case” Jack

"Just in Case" Jack
Co-Founder of TheResilientLife.com and SkilledSurvival.com. Creates content, helps members, and is the visionary behind The Resilient Life’s way of living. Husband, father, mechanical engineer, survivalist, and prepper.
See how to find purpose & fulfilment through living a resilient life.